Pages

Monday, June 27, 2016

How to re-activate Windows 10 after a hardware change


Have you made hardware changes to your PC and now you can't activate? In this guide, we'll show you the steps to use the Activation Troubleshooter to re-activate Windows 10.
When you make significant hardware changes, such as replacing the motherboard or hard drive,Windows 10 won't be able to identify your computer correctly, and as a result, the operating system won't activate.
Previously, if your installation of Windows 10 lost its activation due to a hardware change, you would have to go through the tedious process of contacting Microsoft customer support to re-activate, which is not an ideal solution.
However, Microsoft is now simplifying the process. Beginning with the Windows 10 Anniversary Update, you can link your Microsoft account (MSA) with the Windows 10 digital license on your device. The new feature allows you to access the Activation Troubleshooter quickly to re-activate your free upgrade copy of Windows 10.
In this Windows 10 guide, we'll guide you through the process to link together your Microsoft Account and digital license, and the steps to use the Activation Troubleshooter to re-activate the operating system.

How to link your Microsoft account with the digital license

  1. Use the Windows key + I keyboard shortcut to open the Settings app.
  2. Click Update & security.
  3. Click Activation.
  4. Click Add an account. (Your account must have administrator privileges to go through this process.)
  5. Enter your Microsoft account credentials, and click Sign-in. If the local account isn't connected to a Microsoft account, you'll also need to enter the password for the local account.
Once you completed the process, you will see the "Windows is activated with a digital license linked to your Microsoft account" message in the Activation page, indicating that the linked was successfully processed.
If you have already used an MSA while upgrading to Windows 10, your account and digital license will connect automatically, and you'll see the same "Windows is activated with a digital license linked to your Microsoft account" message. In which case, you can skip the previous steps, and jump to the instructions below.

How to use the troubleshooter to re-activate Windows 10

After linking your Microsoft account with the digital license, you can use the new Activation Troubleshooter to re-activate Windows 10 after making a hardware change on your computer.
  1. Use the Windows key + I keyboard shortcut to open the Settings app.
  2. Click Update & security.
  3. Click Activation.
  4. If you see the activation status message: Windows is not activated, then you can clickTroubleshoot to continue. (Your account must have administrator privileges to complete this process.)
  5. Click the "I changed hardware on this device recently" link.
  6. Enter your Microsoft account credentials, and click Sign in.
  7. You'll need to enter you local account password if a Microsoft account hasn't been added to your computer. Click Next to continue.
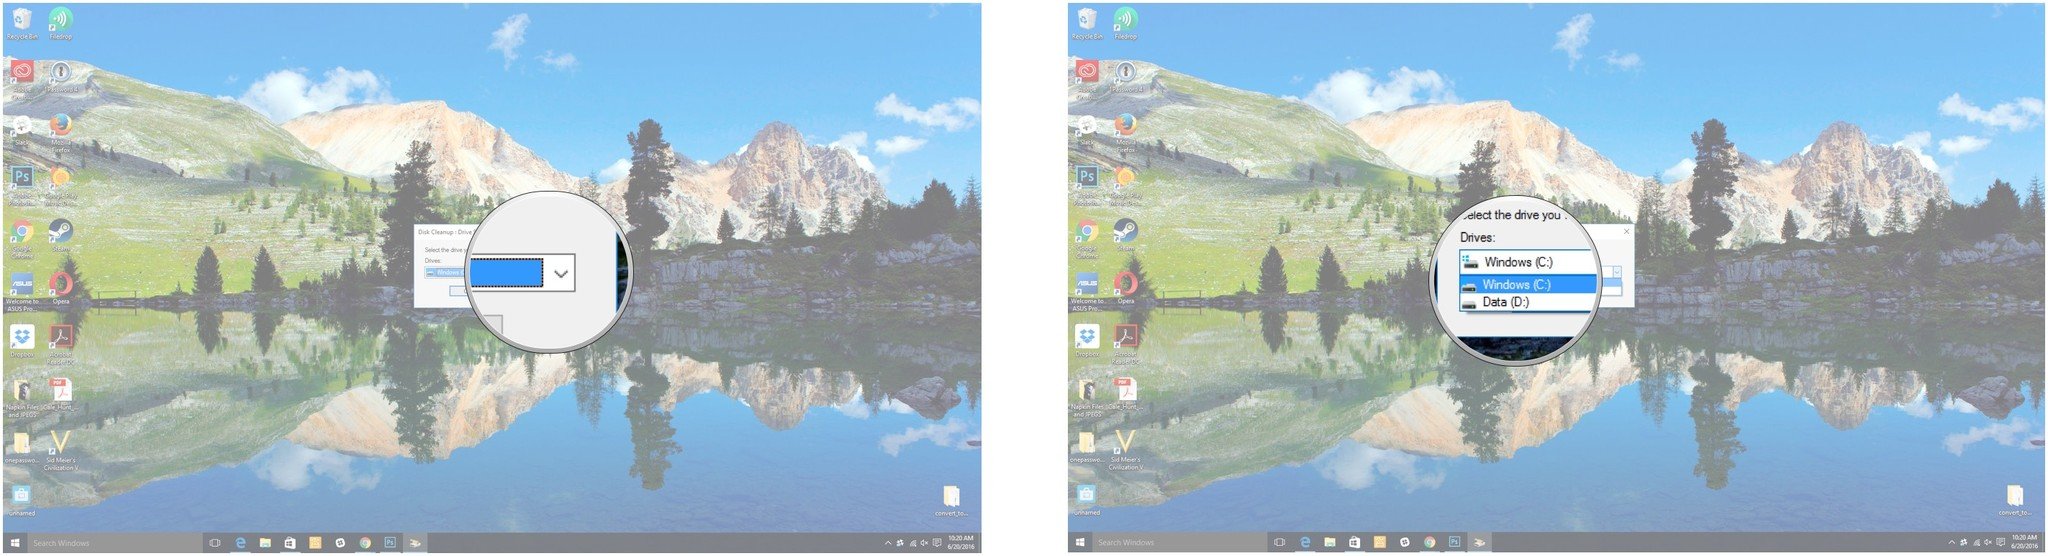
  8. A list of devices associated with your Microsoft account will populate. Select the device you want to re-activate.
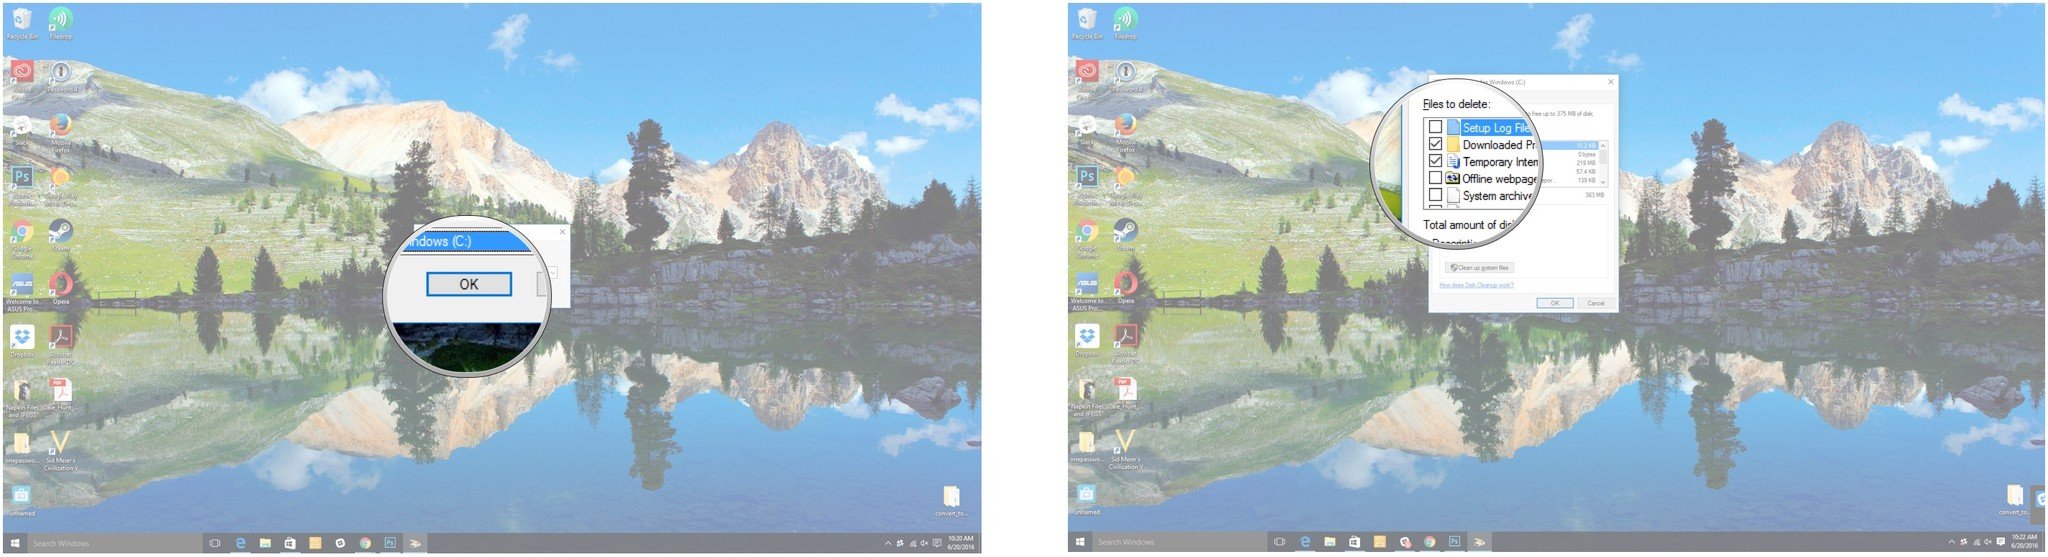
  9. Check the "This is the device I'm using right now" option, and click the Activate button.
If you want to see other devices linked to your account, you can click the "See other devices linked to your Microsoft account" link. On this page, you'll see a list of devices divided into three categories (Edition doesn't match, Device type doesn't match, and Windows isn't activated), explaining the reason why Windows 10 cannot activate from the other devices.

Additional troubleshooting steps

In case your device doesn't appear on the list there may be some things that are happening, and we'll go through those now.
First, make sure you're signed in with the Microsoft account that you've previously linked to the Windows 10 digital license.
If you're using the correct Microsoft account, then you'll have to investigate the reason why you can't activate.
Here's a list of possible problems:
  • Windows 10 was never activated on your computer.
  • Your computer isn't running a genuine version of the operating system.
  • The edition of Windows 10 doesn't match the edition of the operating system you linked to your digital license.
  • The device you're trying to activate doesn't match the type of device you've linked to your digital license.
  • There is a limit number of times you can re-activate. If you reach that limit, you won't be able to activate Windows 10.
  • The edition of the operating system installed on your computer is not Windows 10 Pro or Windows 10 Home.
  • Your computer is a managed device by your organization, in which case the re-activation tool is not available. If this is your case, you'll need to contact your system administrator.
If after using the Activation Troubleshooter, you can't activate Windows 10, then you will probably have to contact Microsoft customers support for assistance.

Wrapping things up

Since the first release of Windows 10 to the public, Microsoft has been making a lot of improvements, including to the activation process. However, there are still scenarios where you may run into activation problems, and the new tool should make things easier to help users upgrade their computer's hardware without hassle.
It's important to note that Microsoft is making available the new Activation Troubleshooter with the Windows 10 Anniversary Update. Users part of the Insider program can use this tool starting with the release of Windows 10 build 14371 or later.
While it can be obvious for many users, remember that you won't be able to re-activate Windows 10 after a hardware change until you add a Microsoft account to your computer. Also, theTroubleshoot option won't be available unless the operating system is not activated.
Finally, you probably already noticed, but Microsoft is also renaming the product key type for the upgrade version of Windows 10 from "digital entitlement" to "digital license."

#A Solution By http://www.windowscentral.com

How to speed up slow pc

How do I speed up my PC?
Just like automobiles, PCs need tune-ups once in a while in order to continue operating properly for the long haul. Whether you experience severe frustration each time you sit down at your PC, or you're looking to maximize your productivity with a small boost to performance, you don't necessarily need to invest in a whole new computer. These tips should get your PC unstuck and running again at its full potential.
1. Restart your PC
Yes, this is simple, and may seem obvious. No, you might not have restarted your PC in a while. Using the sleep function is quick and easy, but restarting your PC clears RAM, installs any pending updates, and fixes potential problems with apps being open too long. This is almost always a great first step when trying to boost your PC's speed.

2. Change your power plan

Windows 10 has several power options built in for your convenience. The default plan is balanced for performance and energy use. If you're not concerned about using too much energy, change the plan so that you're getting maximum performance.

How to change your power plan in Windows 10

  1. Click the Start button.
  2. Type power options in the Windows search bar.
  3. Click Power Options.
    Type power options in the Windows search bar. Click Power Options.
  4. Click the drop-down arrow next to Show additional plans.
  5. Click High performance.
    Click the drop-down arrow next to Show additional plans. Click High Performance.

3. Free up space on your hard drive

RAM only does so much — when it's used up, programs will borrow memory from the hard drive. If your hard drive is full...well, there isn't anything to borrow from. Using Disk Cleanup will clear up space taken by temporary files and caches that don't need to be there.

How to run Disk Cleanup in Windows 10

  1. Click the Start button.
  2. Type Disk Cleanup in the Windows search bar.
  3. Click Disk Cleanup.
    Type Disk Cleanup in the Windows search bar. Click Disk Cleanup.
  4. Click the drop-down arrow beneath Drives.
  5. Click the disk you want to clean.
    Click the drop-down arrow beneath Drives. Click the disk you want to clean
  6. Click OK. The utility will scan to see what files can be removed.
  7. Click the checkbox beside any categories you'd like to clean.
    Click OK. Click the checkbox beside any categories you'd like to clean.
  8. Click OK.
  9. Click Delete Files.
    Click OK. Click Delete Files.
While Disk Cleanup is a good start, you will also want to go into your hard drive and manually remove irrelevant programs (like bloatware) and files. Old photos, videos, and music can also be transferred to an external drive. Every hard drive benefits from a purge.

4. Optimize your files

As files are moved around — created, deleted, modified — they become fragmented; the hard drive will write part of a file in one place and the rest of a file in another place. When you try to access the file later on, it takes your PC longer to find all the pieces. Imagine putting a puzzle together when the pieces are scattered throughout your house. Using the defragment tool collects pieces of files and puts them together on your hard drive.

How to defragment your hard drive in Windows 10

  1. Click the Start button.
  2. Type defragment in the Windows search bar.
  3. Click Defragment and Optimize Drives.
    Type defragment in the Windows search bar. Click Defragment and Optimize Drives.
  4. Click the drive you'd like to defragment. 5.Click Optimize.
    Click the drive you'd like to defragment. Click Optimize.
Your hard drive will begin the defragmentation process. Note: defragmenting is only useful for spinning platter-based hard drives. If you're using an SSD (solid state drive), defragmenting is not recommended.

5. Make your startup faster

If your PC has been around for awhile, you might have added (knowingly or not) permissions for programs to run at startup. These programs take priority from essential boot processes, slowing your startup. The programs continue to run, slowing everything down while you work. The solution? Cut the programs that aren't essential.

How to optimize your startup in Windows 10

  1. Click the Start button.
  2. Type start up in the Windows search bar.
  3. Click See which processes start up automatically….
    Type start up in the Windows search bar. Click See which processes start up automatically...
  4. Click a process you'd like to disable from running during startup.
  5. Click disable. Repeat these steps for any processes you'd like to disable.
    Click a process. Click disable.

6. Get rid of unnecessary animations

Moving windows, opening the Start menu, and many other motions have visual effects that can slow down your computer's performance. The visual effects can be configured for best performance, or you can choose which animations to remove individually.

How to disable animations in Windows 10

  1. Click the Start button.
  2. Type performance in the Windows search bar.
    Click the Start button. Type performance in the Windows search bar.
  3. Click Adjust the appearance and performance of Windows.
  4. Click any animations you'd like to disable. The check disappears when it's disabled.
    Click Adjust the appearance and performance of Windows. Click any animations you'd like to disable.
  5. Click Apply.
  6. Click OK.
    Click Apply. Click OK.

7. Root out malware

Malware infects your computer and makes it do things other than what you want it to — this takes up memory and processor threads, resulting in reduced performance for you. Windows Defender scans your computer and roots out malware embedded in your processes. Not only will this speed up your computer, but you'll also be less vulnerable overall.

How to scan with Windows Defender on Windows 10

  1. Click the Start button.
  2. Type defender in the Windows search bar.
    Click the Start button. Type defender in the Windows search bar.
  3. Click Windows Defender.
  4. Click Scan Now.
    Click Windows Defender. Click Scan Now.

8. Do without Flash

Flash was once an essential part of the internet – not so much anymore. Those annoying auto-play ad videos that cause your computer to slow to a crawl? Blame Flash. Security holes when you load a webpage? Blame Flash.
There is a movement to remove Flash in lieu of HTML5 and Silverlight, but Flash fanatics aren't quite ready to let it go. Microsoft Edge has the option to turn off Flash player capabilities. You will lose some functionality when visiting websites, but big ones (like YouTube) have already moved away from Flash. Try out the internet without Flash — you can always reinstall if you can't live without it.

How to remove Flash from Edge

  1. Launch Edge from your taskbar.
  2. Click the More button located in the top right corner. It looks like three horizontal dots.
  3. Click Settings.
    Click the More button. Click Settings.
  4. Scroll down and click View advanced settings.
  5. Click the switch beneath Use Adobe Flash Player so that it turns off.
    Scroll down and click View advanced settings. Click the switch beneath Use Adobe Flash Player so that it turns off.

9. Add RAM

Still find your computer is running slowly after tweaking settings and removing malware? Depending on the tasks you're trying to accomplish, adding RAM to your computer might be your best bet.
It's relatively inexpensive and easy to install. There are a ton of options to choose from when buying RAM; just remember that more is generally better. If you're uncomfortable choosing the right RAM for your PC, Newegg has an excellent function that shows you what RAM is compatible with your system and links to buy it.

10. Invest in a solid state drive

Adding a solid state drive (SSD) to your PC will undoubtedly speed it up. If you use the SSD as a startup drive, you'll have Windows booted and running faster than you've ever seen. SSDs are good for more than just startups — from media editing to gaming, everything you click on will load faster due to a lack of moving parts. There are plenty of SSDs to choose from; size, manufacturer, and price are up to you to choose.